
The first silver figures emerged from the mist on the far side of the ruined imperial outpost, walking slowly but with the lazy confidence that they could not die. El'J'Shas'ka ignited his Fusion Blade and began indicating targets for his marker drones to begin tracking for the rest of the cadre.
He leapt from the bunker's parapet, thrusting his battle suit straight toward the enemy. He would engage them as far away from the Fio as possible. Time was against him, but the Greater Good would prevail.---
The Armies
Necron Decurion Detachment
- Royal Court
- Imhotek, Lord, Cryptek
- Reclamation Legion
- Overlord
15 Warriors in a Night Scythe - 10 Warriors in a Ghost Ark
- 5 Immortals
- 5 Tomb Blades
- 10 Lychguard
- Canoptek Harvest
- spyder, 5 scarabs, 6 wraiths
He is relatively new to the game, so he was still finding out what units he liked and what units were good. His inexperience showed through a couple times when he targeted units that were not actually contributing to my victory at all.
Tau (Farsight Enclaves+Tau Empire)
I've outlined my army's composition HERE. It is reminiscent of my usual list, but since Forgeworld was allowed I took advantage and fielded some of my seldom-used toys.
The Scenario

We also secretly selected our secondary objectives. I chose 1st Blood, Linebreaker, and marked his Ghost Ark for death. He chose Linebreaker, marked my Kroot for death, and an objective that required him to kill all my Troop choices. Each secondary was worth 2 points.
Deployment: Dawn of War
Night Fight: No
First Turn: Necrons
Warlord Traits: My warlord was WS5 from the FSE traits, and Imhotek got to choose his each turn.
Disclaimer: The diagrams may not always match up exactly with the pictures. Things get forgotten or moved around in the mind. Just take it in stride and keep reading. It is also difficult to show both the regular movement and the "thrust" movement for jetpacks and jetbikes. That is why you will sometimes see units moving out of turn.
Disclaimer: The diagrams may not always match up exactly with the pictures. Things get forgotten or moved around in the mind. Just take it in stride and keep reading. It is also difficult to show both the regular movement and the "thrust" movement for jetpacks and jetbikes. That is why you will sometimes see units moving out of turn.
Deployment
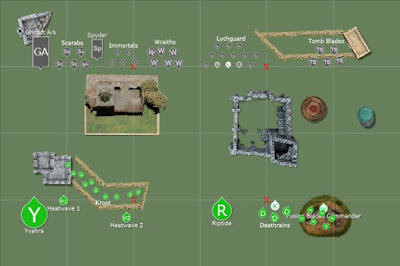
I countered by putting my Kroot and some Heatwaves on one objective to slow down his wraiths and scarabs. I put the Y'vahra opposite the only vehicle on the board. My Deathrains+Kingfisher, Riptide, and Fusion Blades Commander (FBC)+Drones all deployed on the right.
Necron Turn 1

The tomb blades didn't kill anything this turn. The Ghost ark and the warriors inside targeted my Kroot. My Kroot went to ground and suffered no casualties.
Tau Turn 1

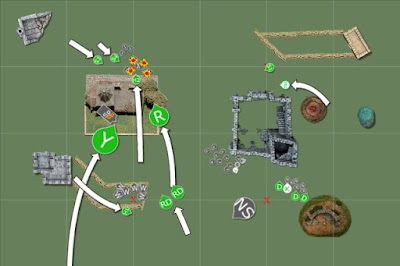
My Y'vahra immediately jetted up behind the Ghost Ark, poised to tear it a new one. My other units shuffled around to make sure they had line of sight to the Tomb Blades.
The Y'vahra torched the Ghost Ark but unfortunately failed to kill any of the warriors inside. The Ion weapon stripped two hull points but failed to kill the vehicle! Thankfully, I did land a Penetrating hit so it was AV11 for the rest of the game. My Deathrains killed two of the Tomb Blades and my Kroot got a lucky wound on one of the Wraiths. The Riptide failed to destroy the Ghost Ark due to Jink as well.
I jumped my units back a bit and jumped my Y'vahra deeper into enemy territory. (see next diagram)
Necrons Turn 2

The Ghost Ark and passengers shot at the Kroot and I failed 3 of my 3+ saves. The Kroot did not flee though. The Tomb blades fired at the marker drones+FBC and killed all but one drone and the FBC (who was now down to two wounds). The newly arrived warriors unloaded buckets of Gauss dice into my Deathrains but my Kingfisher took it all and only lost one wound (ha!). This would have been a great time to use the Neuroweb System Jammer, but I forgot (as always) that I even had it.
The scarabs charged my Y'vahra, losing one base to Overwatch, and tying me up in combat. The Wraiths charged in and killed everything in range, leaving only 2 Kroot way out of position. We got so caught up trying to figure out if we were still locked in combat that I forgot to test leadership (which I definitely would have failed). If the Kroot failed their morale check (needed a 3) and got swept (Initiative 5 vs. Initiative 3) he would have denied me 1st blood by wiping out my Kroot early (he hadn't chosen that option as a secondary objective).
Tau Turn 2

I moved my Heatwaves up to get range on the Ghost Ark, moved the Riptide within 18" of the ark, and my FBC moved straight for the Tomb Blades. My Firewarriors moved and ran straight up the field, making for the objective swarming with Wraiths.
The Heatwaves cooked two of the Necron warriors alive in their transport (So glad I finally got to use No Escape) then my Riptide and a Sunforge that was in range finally managed to blow up the Ghost Ark. My Deathrains shot up the warriors, killing some but I don't remember how many. My Remoras forced the Night Scythe to jink but only stripped one hull point from it. One Sunforge missed the immortals, but his friend killed two. The immortals failed their leadership and fled a little bit. The third Sunforge targeted the scarabs and killed one base.
My FBC and Drone charged his Tomb blades, losing the last Drone to overwatch. My Deathrains charged the Warriors. The FBC killed one Tomb Blade and suffered no wounds, then the Tomb Blades failed their morale check and my FBC ran them down. The Deathrains killed some more warriors but they passed their morale check with flying colors. The Wraiths finished off my poor Kroot.
I managed to jump one of my Sunforges within contest range of the objective held by the immortals, but unfortunately this was one of my Tau Empire suits so it did not have Obsec.
Necrons Turn 3

The warriors from the ghost ark fired at my Heatwave but only managed to inflict one wound. The Immortals regrouped but failed to kill anything. The Night Scythe, failed to damage my Remoras.
The Warriors charged my Heatwave (Relentless!) The Wraiths charged into my fire warriors, taking a single wound in Overwatch. The Scarabs charged my suit that was contesting his objective and killed him easily. The wraiths killed all my Fire Warriors and consolidated back over the objective. The warriors failed to wound my Heatwave (good armour save rolling on my part) and the Heatwave killed one warrior with a superb kick to the face. The necron stayed down and my Heatwave promptly swept the rest of the squad. Who sucks in close combat now! Yes, I know it's against Necrons; just let me have this one! To top it all off, the Lychguard failed their 5" charge!
Tau Turn 3
The Y'vahra torched the scarabs leaving one base on the table. Fun Fact: since the weapon was instant death to the Scarabs, it did not inflict double wounds, which is why one survived. The Sunforges targeted the Scarabs and killed the last base. The Riptide put a wound on the Spyder and the Remoras put another wound on it, but couldn't quite put it down. One heatwave torched the Wraiths but couldn't wound anything, and the other one ran in order to get closer to my opponent's backfield objective.
The Deathrain/Warriors combat ended locked. My Sunforges jumped onto his objective. The Heatwave got in range as well. My Riptide thrusted 12" to act as a road block between my monat suits and his wraiths.
Necrons Turn 4

The immortals wounded one of my Sunforges and the Night Scythe caused a penetrating hit on one of my Remoras (again, I am not sure why he didn't target my Heatwave controlling my home objective).
The Lychguard and necron characters charged into combat and the Lord challenged my Shas'O to mortal combat. My Shas'O powered up his Onager gauntlet and punched him dead on the spot.
 |
| Onager Gauntlet? |
The Wraiths and Spyder charged my Riptide, wounding it twice. I passed my leadership: needed a 7 to pass and I rolled a 6.
Tau Turn 4

My cloudbursts failed to arrive AGAIN. We were almost out of time so we basically skipped my turn. Scoring was done at the beginning of every turn and I'd already scored all my secondary objectives so it didn't matter now.
Results
I had marked his Ghost Ark for death and he had marked my Kroot, so we both scored that secondary. I scored First Blood but if we had been paying attention I would have failed this one. We also both scored Line Breaker.
I'm making a mistake somewhere in my recollection, because I only remember him scoring a single VP on turn 2, but the final score was 2 VP for him. This is what happens when you forget to bring your phone and take actual pictures!
Necrons: Marked For Death(Kroot), Linebreaker, 2 primary objectives. 6 VP
Tau: First Blood, Marked for Death(Ghost Ark), Linebreaker. 3 primary objectives. 9 VP
Tau Victory! even if you take away First Blood
Summary
We were fairly evenly matched throughout the game but he made a bad selection with one of his secondary objectives (one that requires you to kill Every enemy Troop choice). I was controlling the tempo of the objective game, but I had trouble thinking far enough ahead to capitalize on it. I pulled ahead when I controlled 3 objectives, but only in the final turn.
My overall plan of using small expendable units to tie up his wraiths seemed to work out OK. I got some lucky breaks with the close combats but I also failed every reserve roll for my Cloudbursts so I was playing approximately 150 points short. I am sure that, in the hands of a more experienced and patient player, I would have had a much harder time in this game.
We ran out of time pretty early in the game, and I was in a good position to score another 3 VP's in the 5th turn, but time is part of the game in a tourney. Oh well.
Good
- Monats. They are dirt cheap and did their job of objective-capping wonderfully. Their expendable nature made them straightforward to play and ideal for taking up a disproportionate amount of my opponent's resources.
- Support'O. turned my Deathrains into an amazing tarpit unit. Though I probably should have charged him in solo, so that my Deathrains could keep shooting...I forgot to use some of his fun gear (NSJ and VRT)
- Y'vahra. Performed as expected, putting some hurt on some stuff and proving hard to nail down. He didn't have many ideal targets but he helped turn the left flank and kept the Scarabs busy for a turn. I could have targeted the Spyder with him, but it wasn't contributing to the objective game so I didn't bother. The torrent weapon was incredibly deadly to the Scarabs!
Bad
- Cloudbursts. Victim's of the reserve gods. It's only natural when you use tons of reserves that some will end up left behind. I would rather have had them than one of the Sunforges though...
- Marker Drones. Partly my own fault, but I never really got to use their marker hits for anything.
Neutral...
- Riptide. Decent attracting attention and putting out some AP2 firepower. otherwise just shuffled around and looked awkward. A good solid base for the army, but nothing spectacular when you are facing so many 3+ invulnerable saves followed by 4+ RP saves.
Lessons Learned
My stalling tactics worked, but only thanks to some bad luck and tactical errors on his part. I also failed to capitalize on my advantages for the majority of the game. Since most of my units were Obsec and none of his were, I had a distinct advantage over him. However, I kept forgetting that scoring happens at the Beginning of my turn and I put myself out of position a couple times, failing to anticipate that certain of my units would be dead by the time it came around to my turn.
The mission was new to me, but had I done a better job of keeping Obsec units near objectives I could easily have scored another 2 points even with only 3 rounds to score in. I also could have done a better job denying him objectives.
Necrons are tough. I knew that going in and purposefully avoided targeting the big units with invulnerable saves. I was grateful for the close combat capabilities of my army, as close combat was the only area I could make some headway against the Necrons.
I was pleased with the game, as I had managed a win against a very powerful codex, and it was my first game against the new codex too!
Thanks for reading! I hope you enjoyed it.